Branching and Merging
1. Overview
This chapter covers the daily workflow of parallel development in Git — creating branches, combining work through merging and rebasing, resolving conflicts, and temporarily shelving changes with the stash. These are the operations you will use most often when working with others or managing multiple features at once.
In this chapter you will learn:
- How to create, rename, and delete branches
- Merge strategies: fast-forward, 3-way, no-fast-forward, and squash
- How rebasing produces a linear history
- How to cherry-pick individual commits between branches
- How to resolve merge and rebase conflicts
- How to stash and restore work in progress
2. Branching
As covered in Building Blocks, a branch is a pointer to a specific commit. Creating a branch is a “cheap” operation — Git does not copy any files, it only creates a new reference. This section focuses on how branches are used in practice.
Branch workflow
Here is an example workflow showing how branches are created, used, and merged.
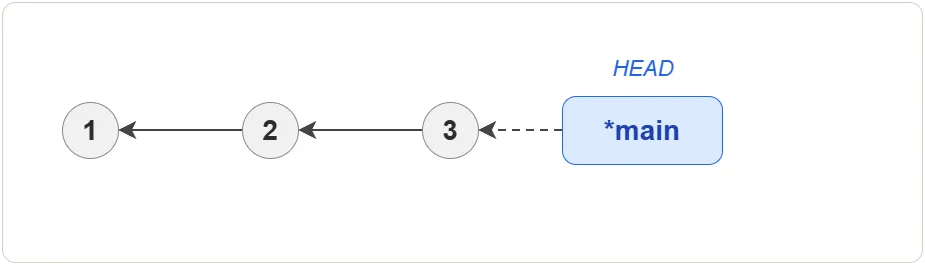
1. Initial state — a linear history with three commits:
2. Create a branch — a new bugfix branch is created at the same
commit. Both branches point to commit #3:
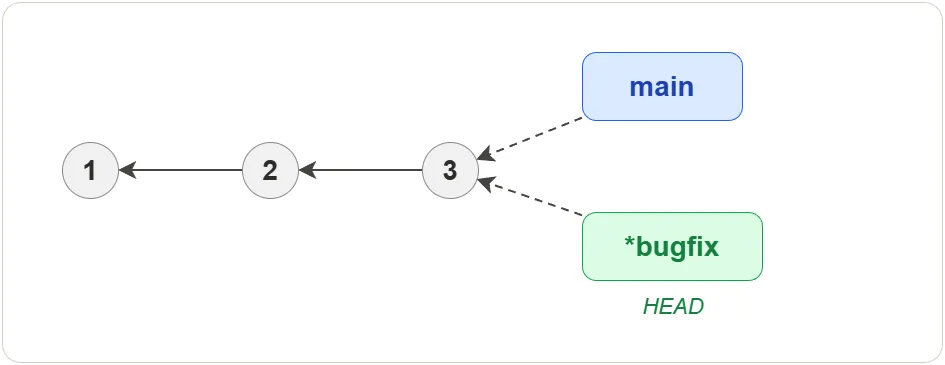
$ git branch bugfix
$ git switch bugfix
The two commands above can be combined into one:
$ git switch -c bugfix
The -c flag creates the branch and switches to it in a single step.
3. Commit on the new branch — commit #4 is added on bugfix.
main stays at commit #3:
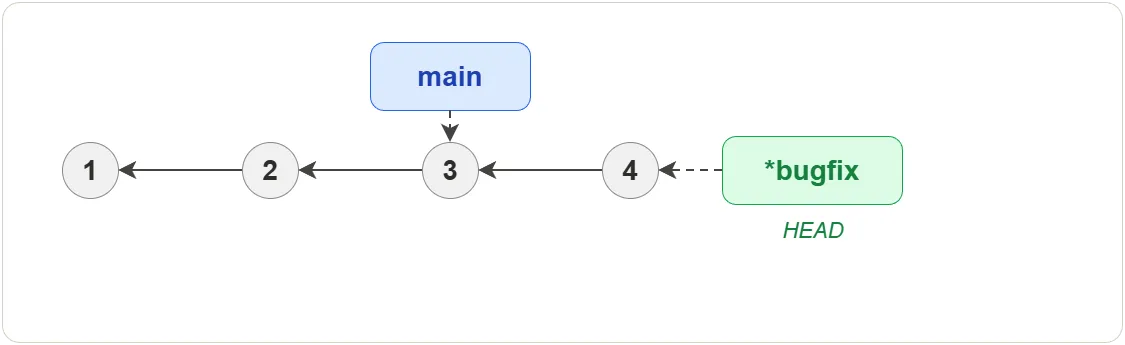
4. Commit on main — switching back to main and committing creates
a divergence. Both branches now have commits the other doesn’t:
$ git switch main
# ... make changes ...
$ git commit -m "Update on main"
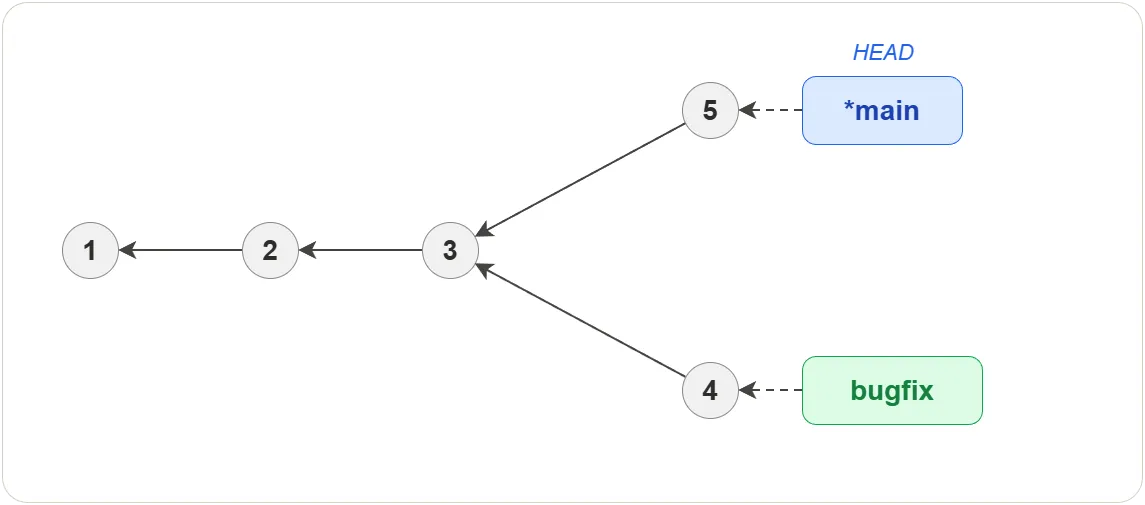
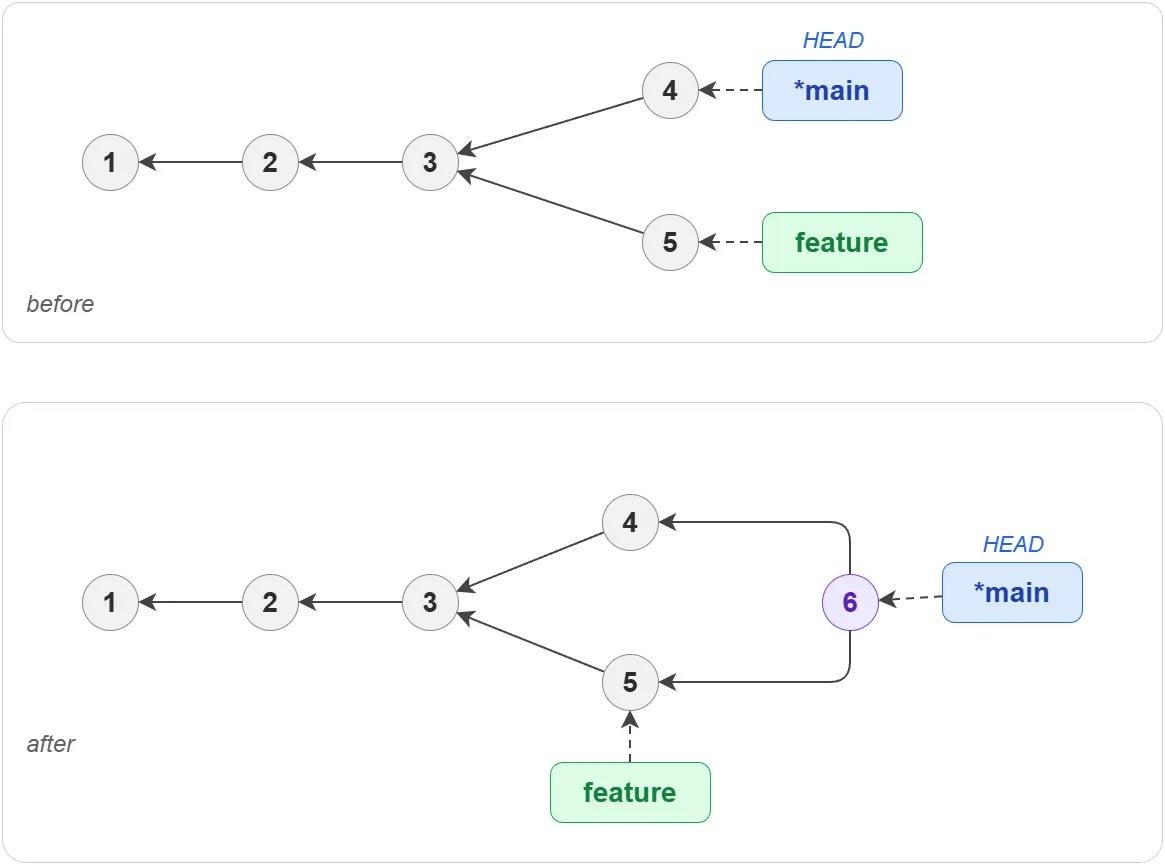
5. Merge — merging bugfix into main creates a merge commit (#6)
that combines both lines of work:
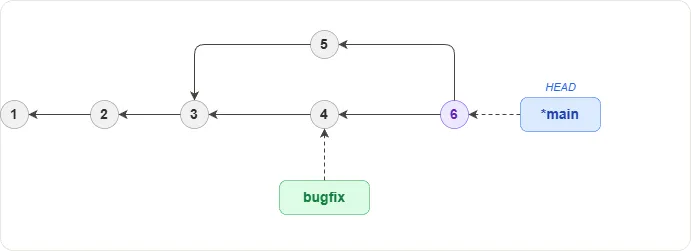
$ git merge bugfix
After merging, the bugfix branch can be safely deleted — its changes
are now part of main.
Deleting branches
Deleting a branch removes only the named reference, not the commits.
git branch -d <branchName>          # safe — only works if merged
git branch -D <branchName>          # force — deletes even if unmerged
With -D, unmerged commits become orphaned and will be cleaned up by
Git’s garbage collector. Until then, the branch can be restored.
Renaming branches
The current branch can be renamed using:
git branch -m <newName>
To rename a different branch:
git branch -m <oldName> <newName>
3. Merging
Merging is a process of combining changes from different branches. Usually this is required when people are working in parallel on the same source code. The file versions in each branch are compared and analyzed line by line.
$ git switch main              # switch to the branch you want to merge into
$ git merge feature            # merge "feature" into "main"
Git chooses the merge strategy automatically based on the branch history.
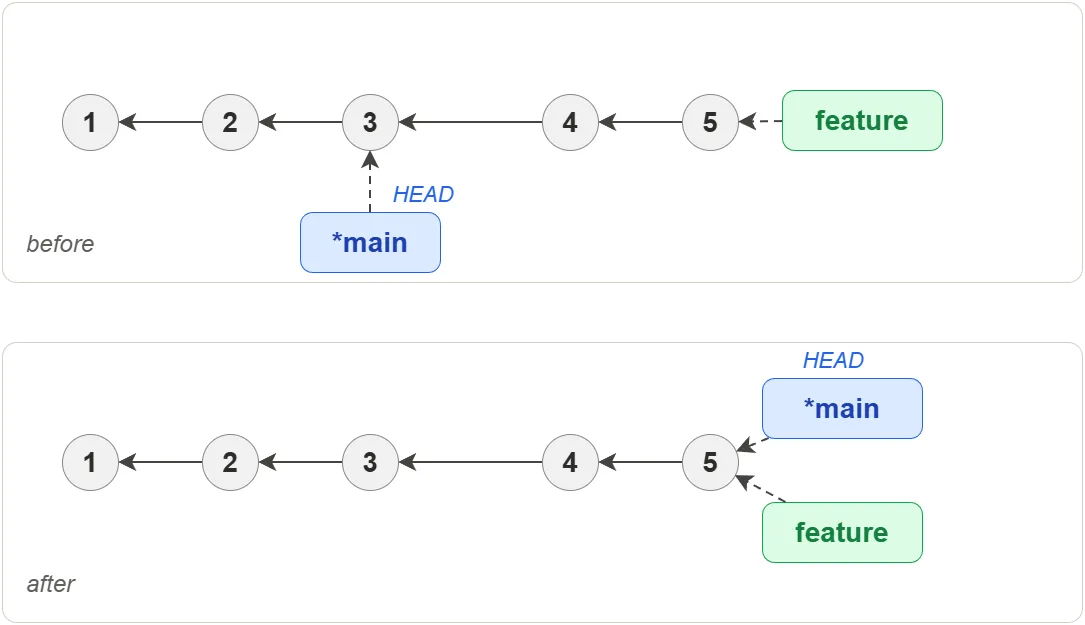
Fast-forward
When the target branch has no new commits since the source branch was created, Git simply moves the target branch tip forward to the latest commit on the source branch. No merge commit is created.
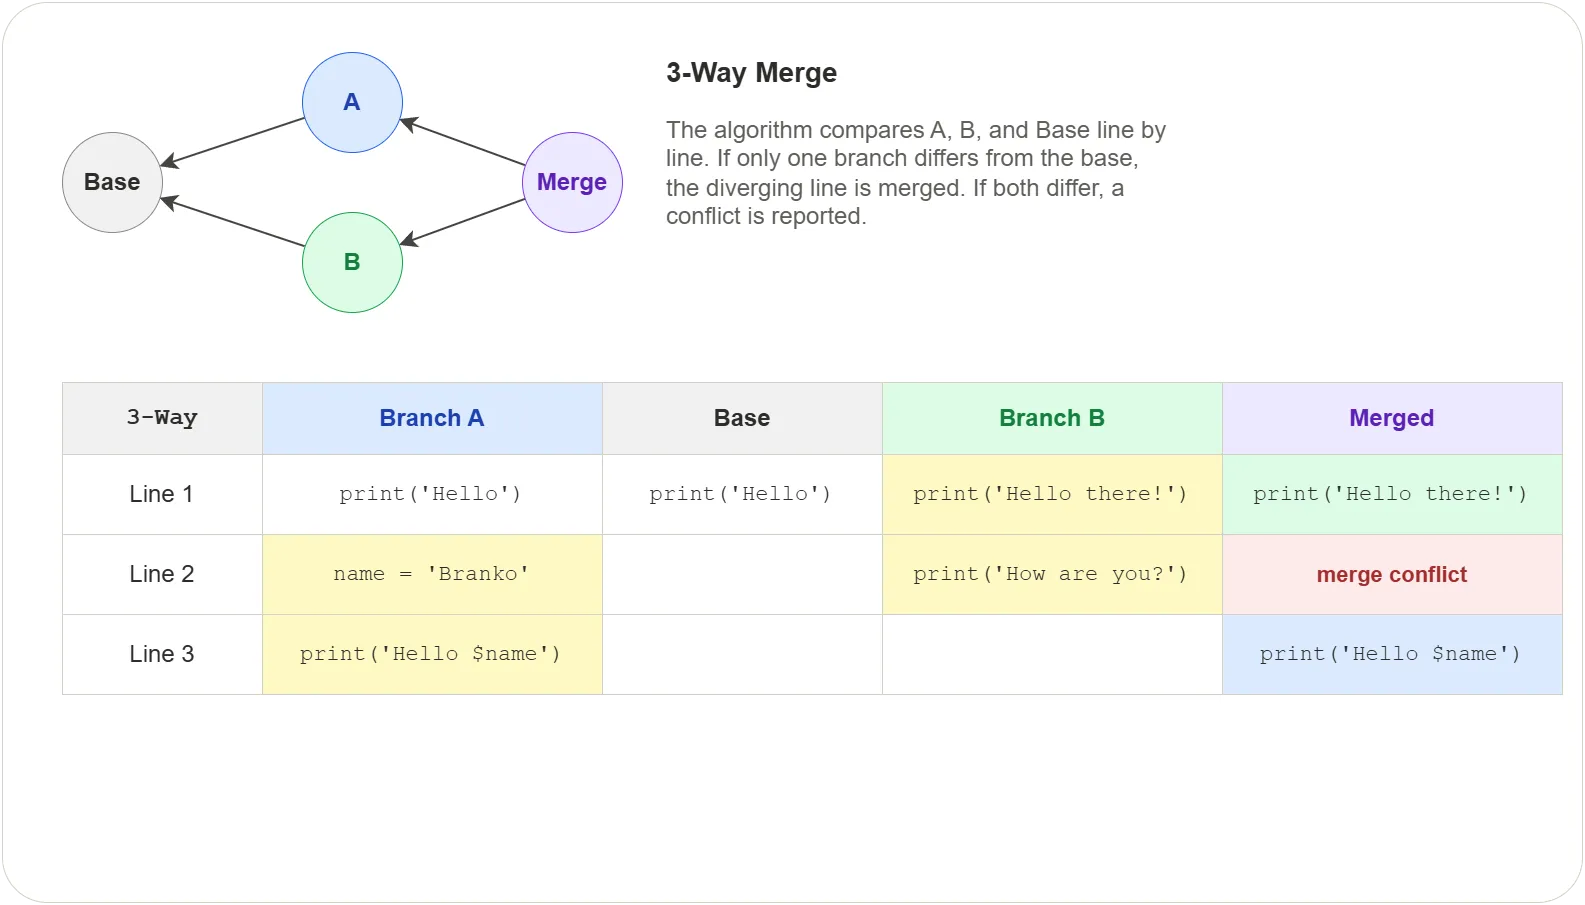
3-Way merge
When both branches have diverged with new commits, Git will analyze the files to determine how to combine the differences. The 3-way merge algorithm uses a common ancestor and the two branch tips to perform the analysis.
It looks for sections which are the same in two of the three revisions. This indicates that the third revision is unique and the section will be added to the merge result. Sections that are different in all three revisions are marked as a conflict situation and left for the user to resolve.
Forcing a merge commit
Even when a fast-forward is possible, you can force Git to create a merge
commit with --no-ff:
$ git merge --no-ff feature
This preserves the branch structure in history, making it clear that a
set of commits came from a feature branch. Many teams require --no-ff
merges so that the history shows when work was branched and integrated.
Squash merge
A squash merge combines all commits from the source branch into a single change set but does not create a merge commit:
$ git merge --squash feature
$ git commit -m "Add feature X"
The result is a single commit on the target branch containing all the changes. The source branch history is not linked — Git does not record that a merge happened, so you must delete the source branch manually afterward.
Squash merges are useful when a feature branch contains many small or
messy commits and you want a clean, single-commit result on main.
4. Rebasing
Rebasing is an alternative to merging. Instead of creating a merge commit, it replays your branch’s commits on top of another branch, producing a linear history.
$ git switch feature           # switch to the branch you want to rebase
$ git rebase main              # replay feature commits on top of main
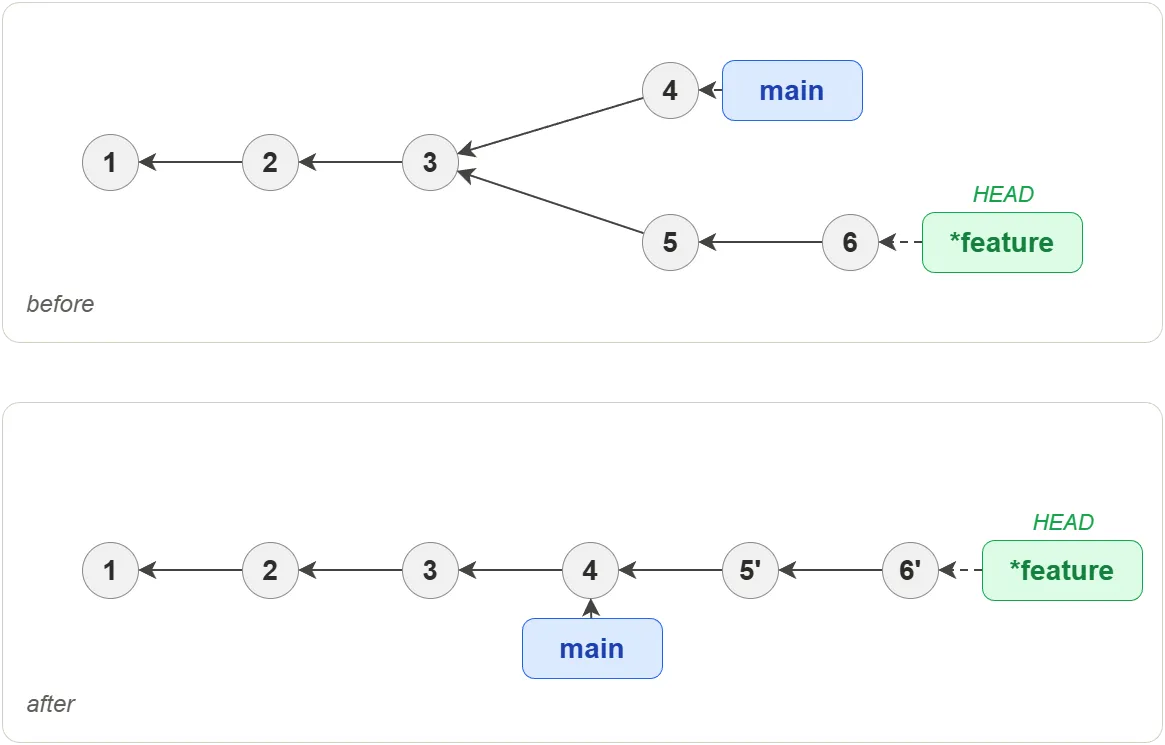
The replayed commits (5’, 6’) are new commits — they have the same changes as the originals but different hashes because their parent changed. The original commits become orphaned.
Warning: Rebasing must be used only on local (unpushed) history. Rebasing shared commits rewrites their hashes and causes conflicts for anyone who already has the originals.
The table below summarizes when to use each approach:
| Merge | Rebase | |
|---|---|---|
| History | Preserves the branch structure (non-linear) | Produces a straight line (linear) |
| Creates | A merge commit with two parents | New copies of each commit |
| Safe on shared branches? | Yes | No — rewrites commit hashes |
| When to use | Combining finished work | Cleaning up local history before merging |
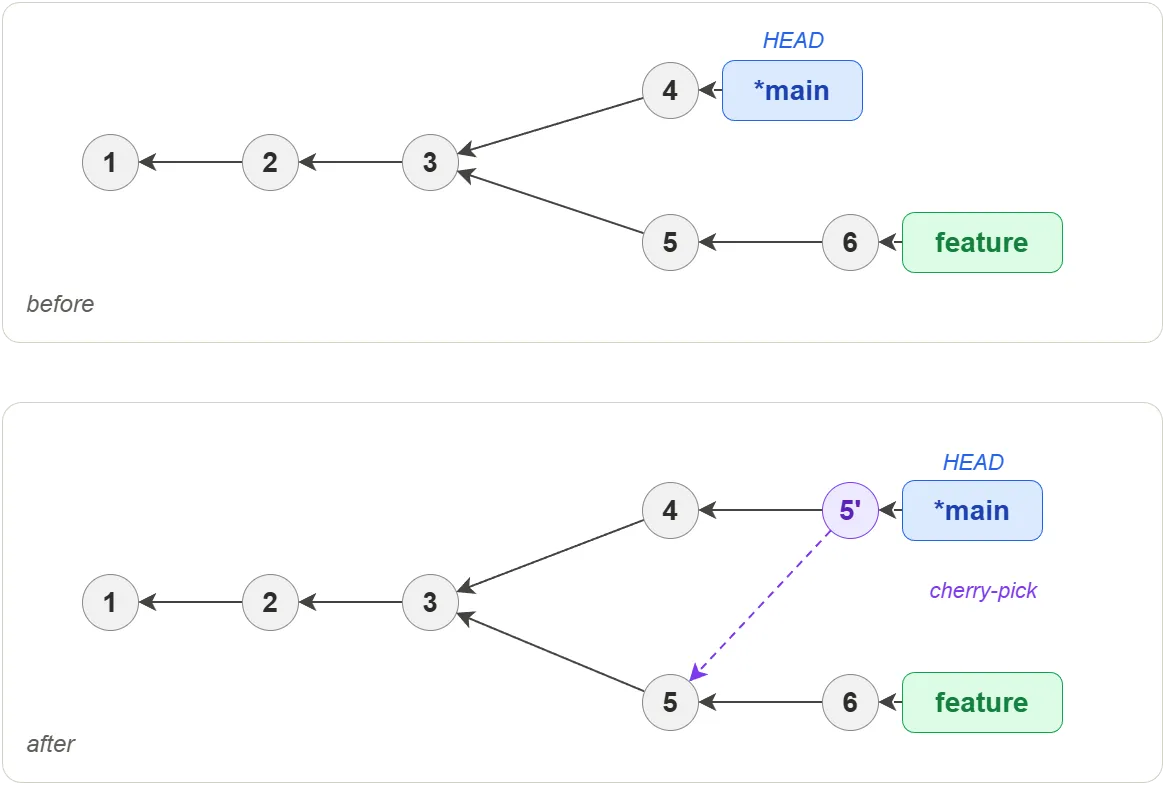
5. Cherry-picking
Cherry-picking copies a single commit from one branch onto another. Unlike merging, it does not bring over the full branch history — only the changes from the selected commit.
$ git cherry-pick abc1234
Git creates a new commit on the current branch with the same changes
as abc1234 but a different hash. The original commit remains on its
branch untouched.
Common use cases:
- Backporting a fix — applying a bug fix from
mainto a release branch without merging all ofmain - Selective integration — pulling one useful commit from a feature branch that is not ready to merge in full
Caution: Cherry-picked commits are duplicates — the same change exists in two places with different hashes. If the source branch is later merged, Git usually handles this cleanly, but it can produce confusing history. Prefer merging when possible.
6. Conflicts
A merge conflict occurs when Git cannot automatically combine changes from two branches. This happens when both branches modify the same lines in the same file, or when one branch deletes a file that the other branch modifies. Git stops the merge and asks the user to resolve the conflict manually.
Conflicts are a normal part of collaborative development. They do not indicate an error — they simply mean that Git needs human judgement to decide which changes to keep.
When conflicts occur
Conflicts can arise during any operation that combines work from different sources:
| Operation | When it conflicts |
|---|---|
git merge | Both branches changed the same lines |
git rebase | A replayed commit touches lines modified upstream |
git cherry-pick | The picked commit overlaps with the current state |
git pull | Remote changes overlap with local changes (see Remote Repositories) |
git stash pop | Stashed changes conflict with the current working tree |
How Git marks conflicts
When Git detects a conflict it inserts conflict markers directly into the affected file. The markers divide the conflicting sections into two parts:
<<<<<<< HEAD
This is the content from the current branch (ours).
=======
This is the content from the incoming branch (theirs).
>>>>>>> feature-branch
| Marker | Meaning |
|---|---|
<<<<<<< HEAD | Start of the current branch content |
======= | Separator between the two versions |
>>>>>>> feature-branch | End of the incoming branch content |
The text between <<<<<<< HEAD and ======= is what exists on the
current branch. The text between ======= and >>>>>>> is what the
incoming branch wants to introduce. The label after >>>>>>> shows the
name of the branch or commit being merged in.
A single file can contain multiple conflict blocks if several regions of the file were changed by both branches.
Conflicts during merge
Resolving a merge conflict follows a predictable sequence:
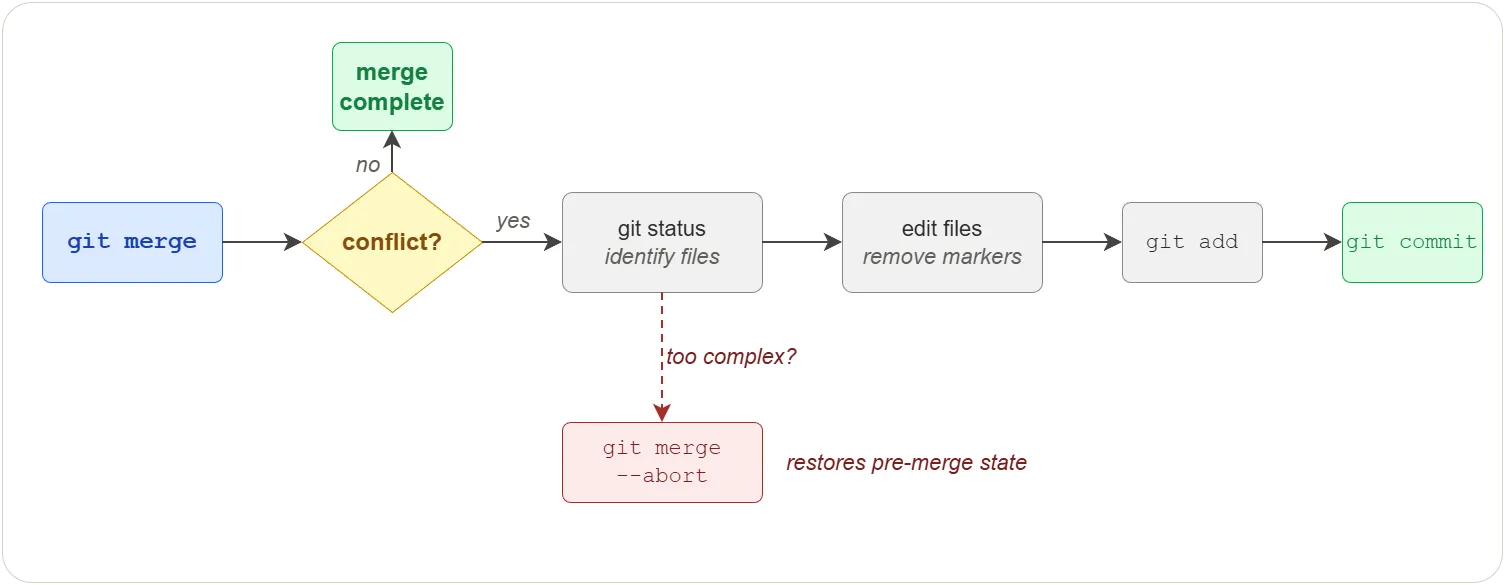
$ git merge feature                  # 1. Git stops and reports conflicts
$ git status                         # 2. Identify the conflicting files
# ... edit each file, remove markers, keep/combine/rewrite content ...
$ git add src/config.yaml            # 3. Stage each resolved file
$ git commit                         # 4. Complete the merge
If the conflict is too complex or the merge was started by mistake, abort and return to the pre-merge state:
$ git merge --abort
Conflicts during rebase
Rebasing replays commits one at a time, so conflicts can occur at each step. The same resolve-stage cycle repeats for every conflicting commit:
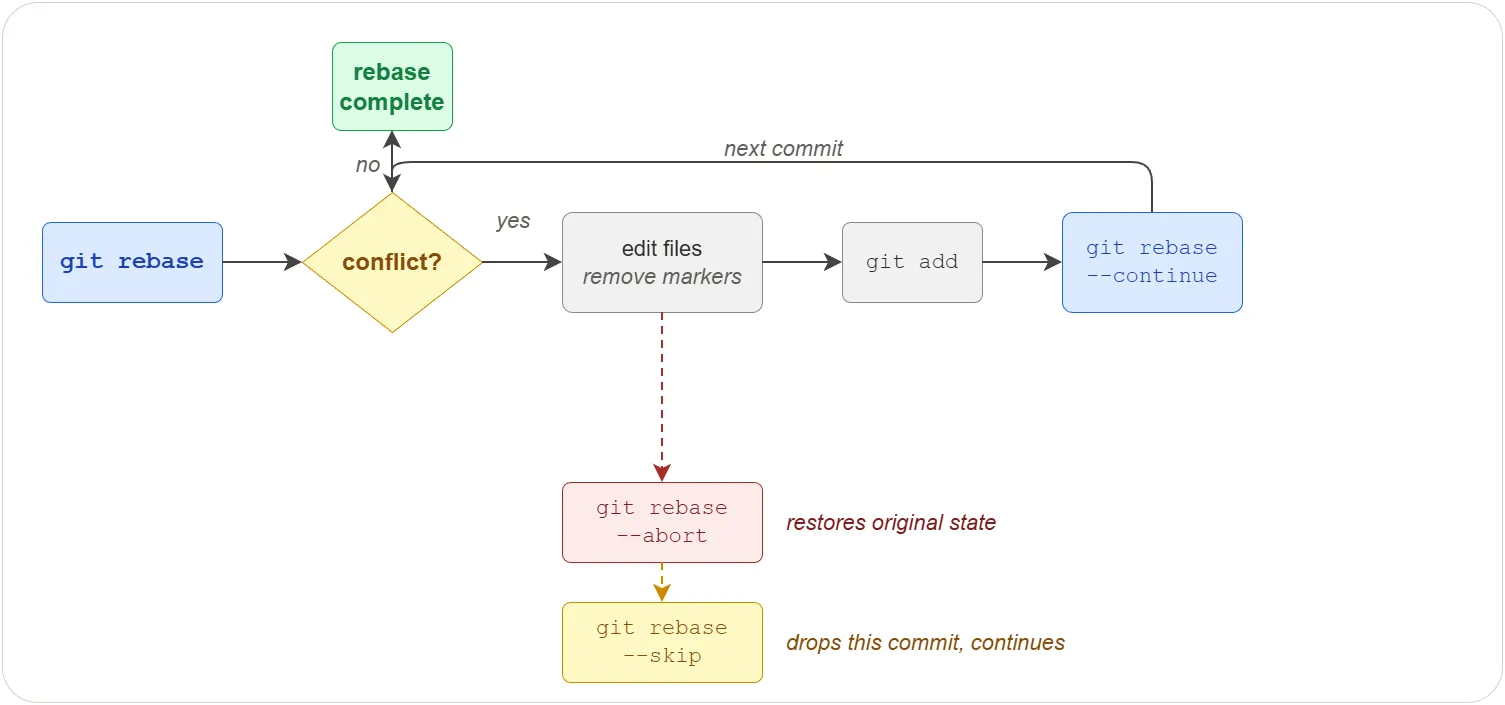
$ git rebase main                    # 1. Git stops at the first conflict
# ... edit the file, remove markers ...
$ git add src/main.py                # 2. Stage the resolved file
$ git rebase --continue              # 3. Replay the next commit
# ... repeat 1-3 if more conflicts arise ...
To abandon the rebase and return to the original state:
$ git rebase --abort
To skip the current conflicting commit (dropping its changes):
$ git rebase --skip
Using merge tools
Instead of editing conflict markers by hand, you can use a graphical merge tool. Most tools show three panes (base, ours, theirs) alongside a result pane.
git mergetool                              # launch the configured tool
git config --global merge.tool meld        # set a default (meld, kdiff3, VS Code, etc.)
git config --global mergetool.keepBackup false   # disable .orig backup files
Preventing conflicts
Conflicts cannot be eliminated, but a few habits keep them small and rare:
| Habit | Why it helps |
|---|---|
| Keep branches short-lived | Less divergence means fewer overlapping changes |
| Pull frequently | Staying close to main catches conflicts early |
| Make small, focused commits | Smaller changes produce simpler conflicts |
| Coordinate with teammates | Knowing who edits which files avoids surprises |
| Avoid whole-file reformatting | Style-only changes conflict with every other branch |
Practical example
Two developers work on the same file. Alice changes a greeting on the
main branch, and Bob changes it on a feature branch.
Initial file (greeting.txt) on both branches:
Hello, welcome to the project.
Alice changes it on main:
Hello, welcome to the project! We are glad you are here.
Bob changes it on feature:
Hi there, welcome to the project.
When Bob merges main into his branch, Git produces a conflict:
$ git merge main
Auto-merging greeting.txt
CONFLICT (content): Merge conflict in greeting.txt
Automatic merge failed; fix conflicts and then commit the result.
The file now contains:
<<<<<<< HEAD
Hi there, welcome to the project.
=======
Hello, welcome to the project! We are glad you are here.
>>>>>>> main
Bob decides to combine both changes:
Hi there, welcome to the project! We are glad you are here.
He removes all conflict markers, stages the file, and completes the merge:
git add greeting.txt
git commit -m "Merge main into feature, combine greeting changes"
The conflict is resolved and the repository history records the merge.
7. Stashing
The stash allows changes to be saved without committing broken or untested code before switching to another branch.
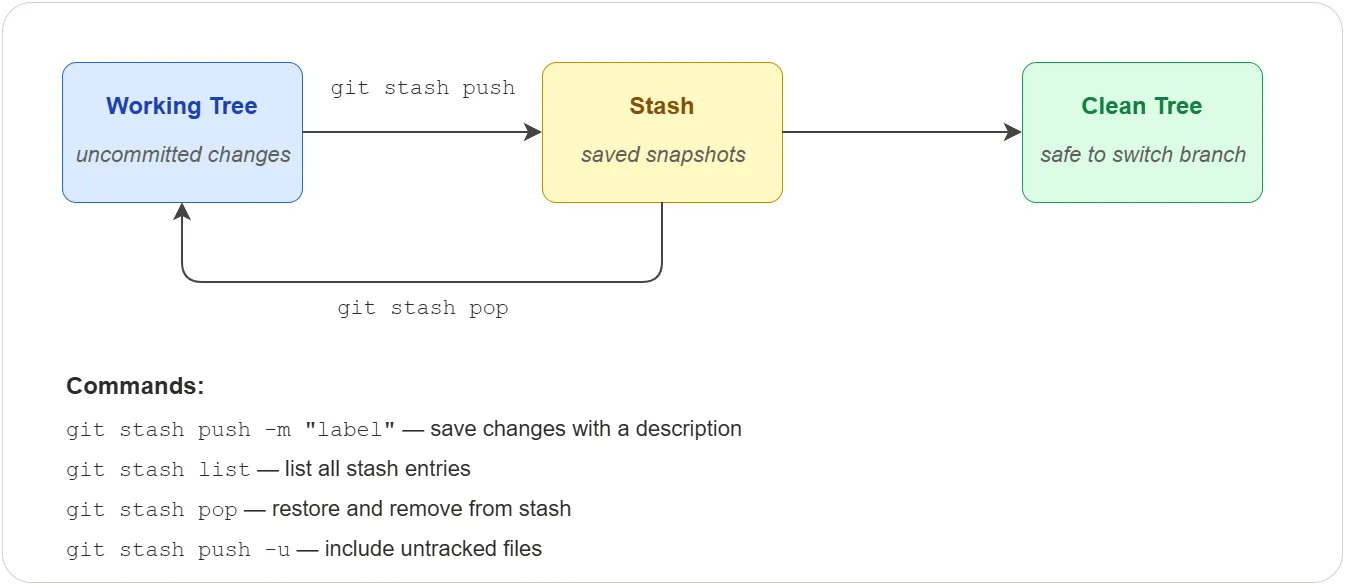
When to use the stash
You are working on a feature branch and need to switch to main for an
urgent fix, but your changes are not ready to commit. The stash saves
your working tree and index state, restores a clean working tree, and
lets you come back later.
How it works internally
Git does not use a separate storage mechanism for stashes — it reuses the same commit objects that power the rest of the repository.
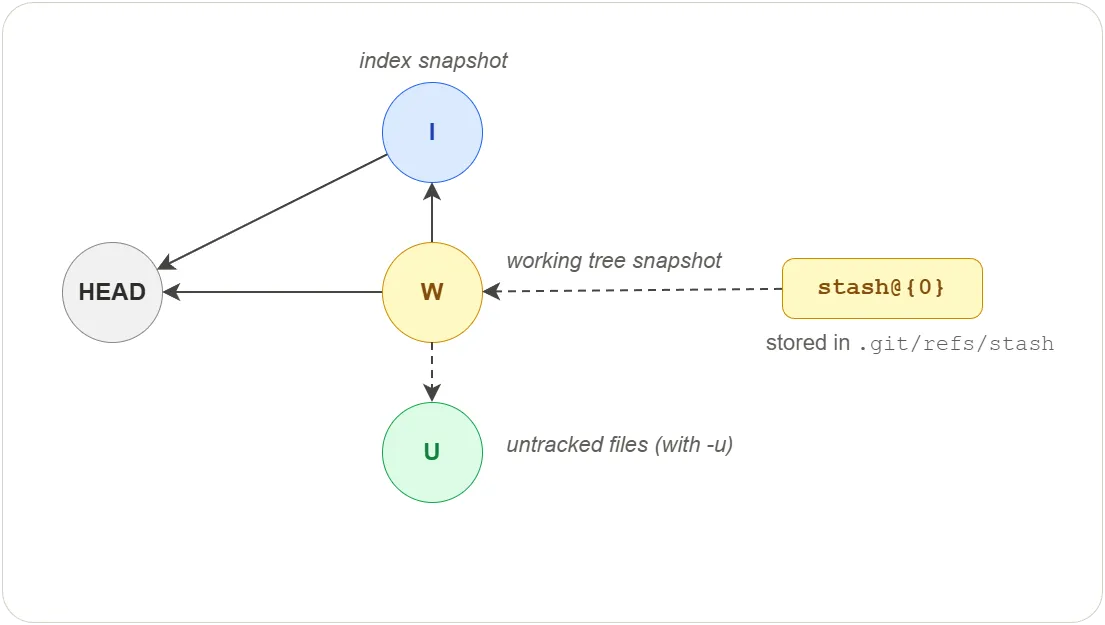
When you stash, your work may exist in two places: files you have
edited but not staged (working tree), and files you have staged with
git add but not committed (index). Git preserves both separately so
that when you restore, staged files return to the index and unstaged
files return to the working tree.
A stash is a commit object W with two parents:
| Commit | Contains | Points to |
|---|---|---|
| W | Working tree changes | HEAD and I |
| I | Staged changes | HEAD |
| U | Untracked files (only with -u) | — |
git stash pop restores both snapshots and removes the stash entry.
git stash apply does the same but keeps the entry for later reuse.
Exercises
All exercises use the concepts-lab repository created in
Building Blocks. If you skipped that chapter, create a new
repository with at least one commit before starting.
Exercise 1: Branch Lifecycle
Task: Practice creating, using, merging, and deleting a feature branch.
Steps:
- In
concepts-lab, confirm you are onmainwithgit branch - Create and switch to a branch called
feature/greetingusinggit branch feature/greetingthengit switch feature/greeting - Create a file
greeting.txtwith the textHello from feature branch - Stage and commit with the message
Add greeting - Run
git log --oneline --allto see both branches - Switch back to
main— confirmgreeting.txtdoes not exist onmain - Merge the feature branch with
git merge feature/greeting - Confirm
greeting.txtnow exists onmain - Delete the feature branch with
git branch -d feature/greeting - Run
git branchto confirm onlymainremains
Verify:
git log --oneline --graph shows the merge. greeting.txt exists on main. git branch lists only main.
Exercise 2: Three-Way Merge with a Conflict
Task: Create a merge conflict, inspect the conflict markers, and resolve it manually.
Steps:
- In
concepts-lab, create a fileconfig.txtwith the linemode=productionand commit it onmain - Create and switch to a branch
feature/debugusinggit switch -c feature/debug - Change the line in
config.txttomode=debugand commit - Switch back to
main - Change the same line in
config.txttomode=stagingand commit - Run
git merge feature/debug - Open
config.txtand locate the conflict markers (<<<<<<<,=======,>>>>>>>) - Run
git ls-files --stageand observe the three stage entries (base, ours, theirs) forconfig.txt - Edit
config.txtto resolve the conflict by choosing one value or combining them - Stage the resolved file with
git add config.txtand complete the merge withgit commit
Verify:
After the merge commit, git log --oneline --graph shows the two branches converging. git ls-files --stage shows a single stage-0 entry for config.txt. The file contains the resolved content with no conflict markers.
Exercise 3: No-fast-forward and squash merge
Task: Compare --no-ff and --squash merge strategies.
Steps:
- In
concepts-lab, create and switch tofeature/noff - Create a file
noff.txt, stage and commit with the messageAdd noff - Switch to
mainand rungit merge --no-ff feature/noff - Run
git log --oneline --graph— note the merge commit even though fast-forward was possible - Create and switch to
feature/squash - Create two files
squash1.txtandsquash2.txt, commit each separately - Switch to
mainand rungit merge --squash feature/squash - Run
git status— the changes are staged but not committed - Commit with the message
Add squash files - Run
git log --oneline --graph— note the single commit with no merge history
Verify:
The --no-ff merge shows a merge commit with two parents. The --squash merge shows a single flat commit. git branch -d feature/squash warns the branch is not fully merged because Git did not record a merge relationship.
Exercise 4: Cherry-pick a commit
Task: Copy a single commit from one branch to another using cherry-pick.
Steps:
- In
concepts-lab, create and switch tofeature/cherry - Create a file
fix.txtwith the contentBug fix, commit with the messageFix bug - Create a file
wip.txtwith the contentNot ready, commit with the messageWork in progress - Run
git log --onelineand note the hash of theFix bugcommit - Switch to
main - Run
git cherry-pick <hash>using the hash from step 4 - Run
git log --onelineonmain— the fix appears as a new commit - Confirm
fix.txtexists onmainbutwip.txtdoes not
Verify:
git log --oneline on main shows the cherry-picked commit with a different hash than the original. fix.txt exists, wip.txt does not. The feature/cherry branch is unchanged.
Exercise 5: Rebase a feature branch
Task: Rebase a feature branch onto main to produce a linear history.
Steps:
- In
concepts-lab, create and switch tofeature/rebase - Create a file
rebase1.txt, commit with the messageAdd rebase1 - Create a file
rebase2.txt, commit with the messageAdd rebase2 - Switch to
mainand create a filemain-update.txt, commit with the messageUpdate main - Run
git log --oneline --all --graph— note the divergence - Switch to
feature/rebase - Run
git rebase main - Run
git log --oneline --all --graph— note the linear history - Check that
main-update.txtexists onfeature/rebase - Run
git log --onelineand compare the hashes of your two feature commits with the originals from step 5
Verify:
The graph shows a straight line — no fork. The feature commits have new hashes because their parent changed. main-update.txt is present on the feature branch.
Exercise 6: Stash and restore work in progress
Task: Use the stash to save uncommitted changes, switch branches, then restore them.
Steps:
- In
concepts-lab, make sure you are onmainwith a clean working tree - Create a file
notes.txtwith the contentWork in progress - Stage the file with
git add notes.txt - Run
git stash push -m "wip: notes"to save the changes - Confirm the working tree is clean with
git status - Run
git stash listand note the stash entrystash@{0} - Inspect the stash reference at
.git/refs/stashand rungit cat-file -pon it - Create and switch to a new branch
feature/other, make any commit, then switch back tomain - Restore the stashed changes with
git stash pop - Confirm
notes.txtis back in the working tree and staged
Verify:
After git stash pop, git status shows notes.txt as a staged new file. git stash list is empty.
Quiz
Q1. What happens during a fast-forward merge?
- A) Git creates a new merge commit with two parents
- B) Git copies files from one branch to another
- C) Git moves the target branch tip forward to the source branch tip — no merge commit is created
- D) Git rebases the source branch onto the target branch
Q2. In a 3-way merge, what are the three revisions Git compares?
- A) HEAD, the index, and the working tree
- B) The first commit, the last commit, and the tag
- C) The local, global, and system configurations
- D) The common ancestor, the current branch tip, and the incoming branch tip
Q3. What does git merge --abort do?
- A) Deletes the branch that caused the conflict
- B) Commits the merge with conflict markers still in the files
- C) Restores the repository to the state before the merge began
- D) Reverts the last successful merge
Q4. Why should you avoid rebasing commits that have already been pushed?
- A) Rebase deletes the commits permanently
- B) Rebase only works on the main branch
- C) Rebase cannot handle merge conflicts
- D) Rebase rewrites commit hashes, causing conflicts for anyone who already has the originals
Q5. What does git merge --no-ff do?
- A) Prevents the merge from happening
- B) Creates a merge commit even when a fast-forward is possible
- C) Merges without resolving conflicts
- D) Deletes the source branch after merging
Q6. What does git cherry-pick do?
- A) Merges an entire branch into the current branch
- B) Copies a single commit onto the current branch with a new hash
- C) Moves a commit from one branch to another, removing it from the source
- D) Reverts a specific commit
Q7. What does a stash store internally?
- A) A patch file in
.git/stash/ - B) A diff of the working tree only
- C) Commit objects for the working tree, index, and optionally untracked files
- D) A compressed archive of the entire repository
Answers
- C — Git moves the target branch tip forward to the source branch tip — no merge commit is created
- D — The common ancestor, the current branch tip, and the incoming branch tip
- C — Restores the repository to the state before the merge began
- D — Rebase rewrites commit hashes, causing conflicts for anyone who already has the originals
- B — Creates a merge commit even when a fast-forward is possible
- B — Copies a single commit onto the current branch with a new hash
- C — Commit objects for the working tree, index, and optionally untracked files