Remote Repositories
1. Overview
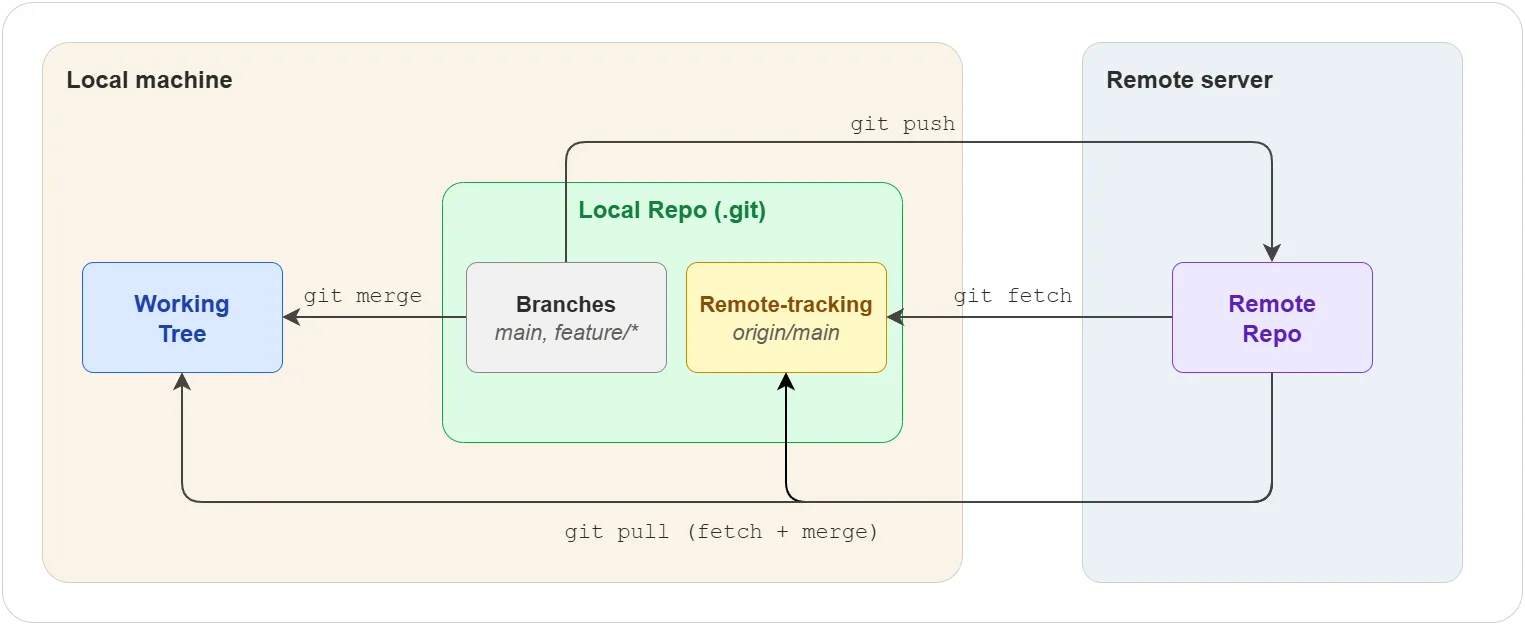
So far, everything you have done with Git has been local — on your own machine, in your own repository. This chapter introduces the other side of Git: working with remote repositories. A remote repository is a copy of your project hosted on another machine, usually a server like GitHub, GitLab, or Bitbucket.
Remote repositories are what make collaboration possible. They let you share your work with others, download their changes, and keep everyone in sync.
In this chapter you will learn:
- What a remote is and where Git stores remote information
- How cloning creates a local copy with everything set up
- How fetching downloads changes without touching your files
- How merging brings fetched changes into your working tree
- How pulling combines fetch and merge in one step
- How pushing sends your commits to the remote
- How forking lets you contribute to projects you do not own
The diagram below shows the full picture. Each operation is explained in detail in the sections that follow.
2. Remotes and Tracking
Before you can fetch or push, Git needs to know where the remote repository is. This section explains how Git stores that information.
What is a remote?
A remote is a named reference to another repository. It has a name
(like origin) and a URL (like https://github.com/user/project.git).
Think of it as a bookmark that tells Git “this is where the other copy
of the project lives.”
Where remotes are stored
Git stores remote information in .git/config. When you add a remote,
Git writes an entry like this:
[remote "origin"]
    url = https://github.com/user/project.git
    fetch = +refs/heads/*:refs/remotes/origin/*
The url is the address of the remote repository. The fetch line
tells Git how to map remote branches to local references:
+refs/heads/*:refs/remotes/origin/*
│    │              │
│    │              └─ store them locally under refs/remotes/origin/
│    └─ take every branch on the remote (refs/heads/*)
└─ + means always update, even if history diverged
For example, when you run git fetch origin, Git takes the remote’s
refs/heads/main and stores it locally as refs/remotes/origin/main.
The remote’s refs/heads/feature becomes refs/remotes/origin/feature,
and so on.
Remote-tracking branches
For every branch on a remote, Git keeps a local read-only reference
called a remote-tracking branch. These follow the pattern
<remote>/<branch>:
.git/refs/remotes/
├── origin/
│   ├── HEAD        ← symbolic ref to the remote's default branch
│   ├── main
│   └── feature
└── upstream/
    └── main
These references live inside your local repository. They are snapshots of where each branch was on the remote the last time you communicated with it.
Key points about remote-tracking branches:
- They are read-only — you cannot commit to them directly
git fetchupdates them to match the current state of the remote (e.g. if someone pushed a new commit tomain, fetch movesorigin/mainforward)git pushalso updates them — after a successful push, Git movesorigin/mainto match your localmain, since the remote now has your commits- They let you compare your local work with the remote state
Branch tracking configuration
Git also stores which local branch is linked to which remote-tracking
branch. This is written to .git/config when you clone or push with
-u:
[branch "main"]
    remote = origin
    merge = refs/heads/main
This tells Git: when you are on main and run git pull or git push
with no arguments, use origin as the remote and refs/heads/main as
the branch to sync with. Here is the full chain of what happens during
a git pull:
- Read section
[branch "main"]— use remoteorigin, branchrefs/heads/main - Read section
[remote "origin"]— look up the URL - Fetch
refs/heads/mainfrom that URL - Store it locally as
refs/remotes/origin/main(using the refspec) - Merge
refs/remotes/origin/maininto your localrefs/heads/main - Update the working tree to reflect the merged state
Checking sync status
$ git branch -vv
This shows each local branch, its tracking relationship, and whether it is ahead, behind, or diverged:
* main     abc1234 [origin/main] Latest commit message
  feature  def5678 [origin/feature: ahead 2] Work in progress
| Status | Meaning |
|---|---|
| ahead 2 | You have 2 local commits not yet pushed |
| behind 3 | The remote has 3 commits you have not fetched |
| ahead 1, behind 2 | Both sides have new commits (diverged) |
Managing remotes
$ git remote             # list remote names
$ git remote -v          # list names with URLs
Example output:
origin  https://github.com/user/project.git (fetch)
origin  https://github.com/user/project.git (push)
To add a new remote:
$ git remote add upstream https://github.com/original/project.git
This adds a new [remote "upstream"] section to .git/config. You
can choose any name, but origin and upstream are conventional:
| Name | Convention |
|---|---|
origin | Your own copy (the one you cloned or created) |
upstream | The original repository you forked from |
To rename or remove a remote:
$ git remote rename old-name new-name
$ git remote remove upstream
Removing a remote also deletes all its remote-tracking branches.
3. Cloning
Cloning is usually the first step when working with a remote repository. It creates a complete local copy of the project — all files, all history, all branches.
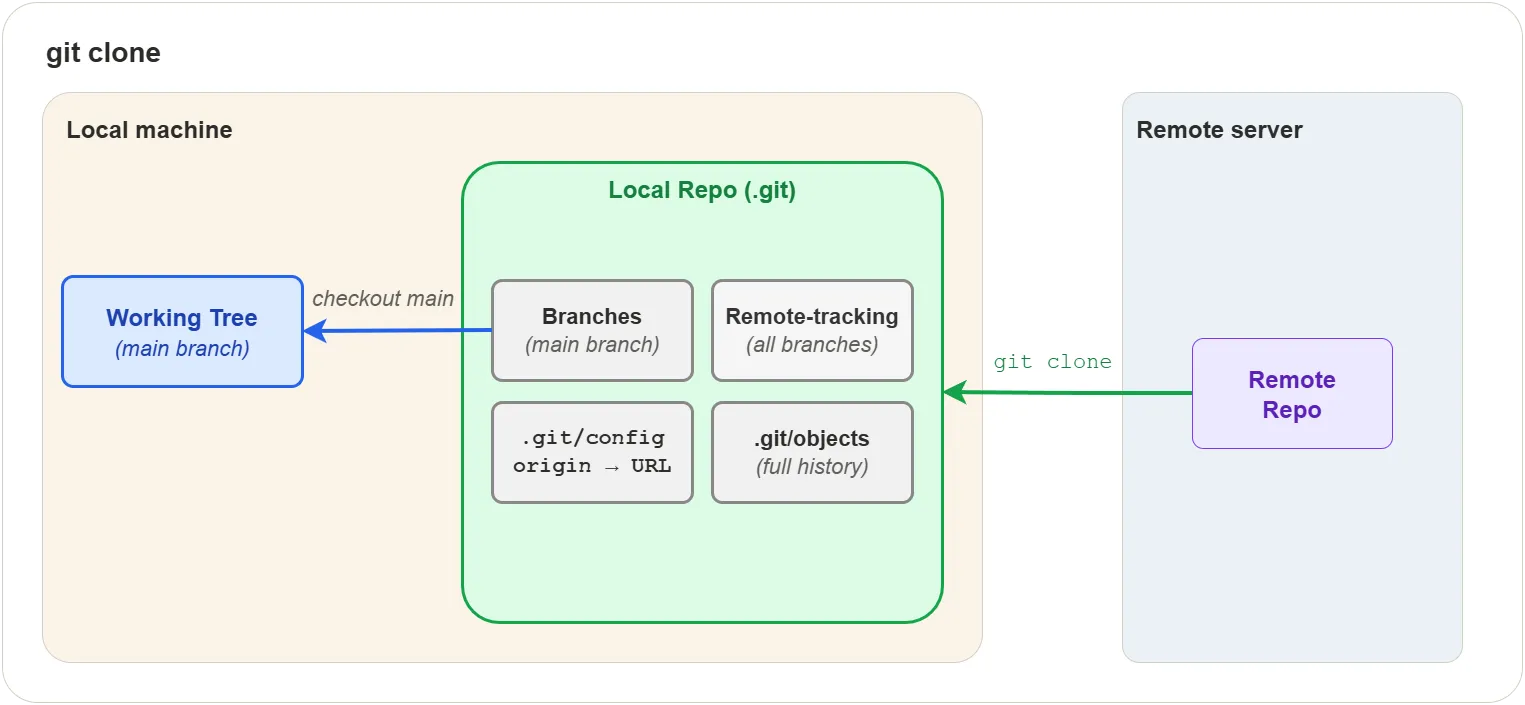
When you run git clone, Git does the following:
- Creates a new directory with the project name
- Initializes a
.git/directory inside it - Downloads the entire commit history into
.git/objects/ - Creates a remote called
originpointing to the source URL - Creates remote-tracking branches for every branch on the remote
(e.g.
origin/main) - Creates a local
mainbranch that tracksorigin/main - Checks out
maininto the working tree
After cloning, your local repository is a fully independent copy. You can work offline, make commits, and create branches — all without contacting the remote.
$ git clone https://github.com/user/project.git
$ git clone https://github.com/user/project.git my-folder   # custom directory name
Git supports two URL protocols:
| Protocol | URL format | Notes |
|---|---|---|
| HTTPS | https://github.com/user/repo.git | Works everywhere, prompts for credentials |
| SSH | git@github.com:user/repo.git | Requires SSH key setup, no password prompts |
HTTPS is simpler to start with. SSH is covered in the Appendix.
4. Fetching
After cloning, time passes. Other people push changes to the remote. Your local copy falls behind. Fetching is how you download those changes.
git fetch contacts the remote, downloads any new commits, and
updates your remote-tracking branches. That is all it does. It does
not change your working tree, your local branches, or your staging
area.
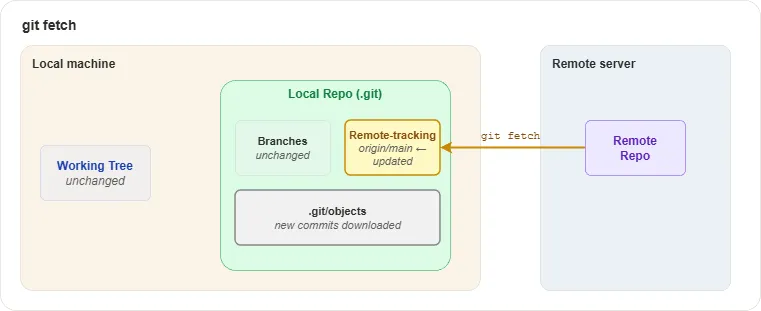
The diagram highlights what changes and what stays the same:
- Remote-tracking branches — updated (e.g.
origin/mainmoves forward to match the remote) - .git/objects — new commit, tree, and blob objects are downloaded
- Your branches — unchanged
- Your working tree — unchanged
- Your staging area — unchanged
This is what makes git fetch safe. You can run it at any time without
risking your current work.
$ git fetch origin             # fetch all branches from origin
$ git fetch origin main        # fetch only the main branch
$ git fetch --all              # fetch from all configured remotes
After fetching, you can inspect what changed before deciding to integrate:
$ git log main..origin/main    # commits on remote that you don't have
$ git diff main origin/main    # line-by-line differences
5. Merging Remote Changes
After fetching, your remote-tracking branches are up to date, but your local branches and working tree have not changed. To bring the fetched changes into your working tree, you merge.
$ git merge origin/main
This merges the remote-tracking branch origin/main into your current
branch (usually main).
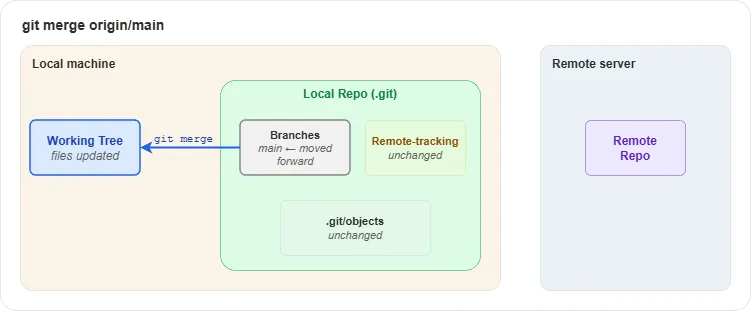
The diagram highlights what changes:
- Your branch ref —
mainmoves forward to include the new commits - Your working tree — files are updated to reflect the merged state
- Remote-tracking branches — unchanged (they were already updated by fetch)
If your local branch has no commits that the remote does not have, Git performs a fast-forward merge — it simply moves the branch pointer forward. No merge commit is created.
If both sides have new commits, Git creates a merge commit, just like merging any two branches (see Branching and Merging).
Handling conflicts
If the remote changes conflict with your local changes, Git stops and asks you to resolve — the same process described in Branching and Merging. After resolving:
$ git add <resolved-file>
$ git commit
6. Pulling
Now that you understand fetch and merge separately, pulling is simple:
git pull is just git fetch followed by git merge, combined into
one command.
$ git pull origin main
This is equivalent to:
$ git fetch origin main
$ git merge origin/main
When you run git pull with no arguments, Git uses the branch tracking
configuration in .git/config to determine the remote and branch
automatically (see Branch tracking configuration
in section 2).
When should you use git pull versus git fetch + git merge
separately?
- Use
git pullwhen you trust that the merge will be straightforward and want to save a step - Use
git fetchfirst when you want to inspect what changed before integrating, or when you suspect conflicts
Pull with rebase
By default, git pull creates a merge commit when your branch has
diverged from the remote. To produce a linear history instead, use
rebase:
$ git pull --rebase origin main
This replays your local commits on top of the remote changes, avoiding the merge commit. Many teams prefer this for feature branches to keep the history clean.
To make rebase the default pull strategy:
$ git config --global pull.rebase true
7. Pushing
Pushing is the reverse of fetching — it uploads your local commits to the remote repository.
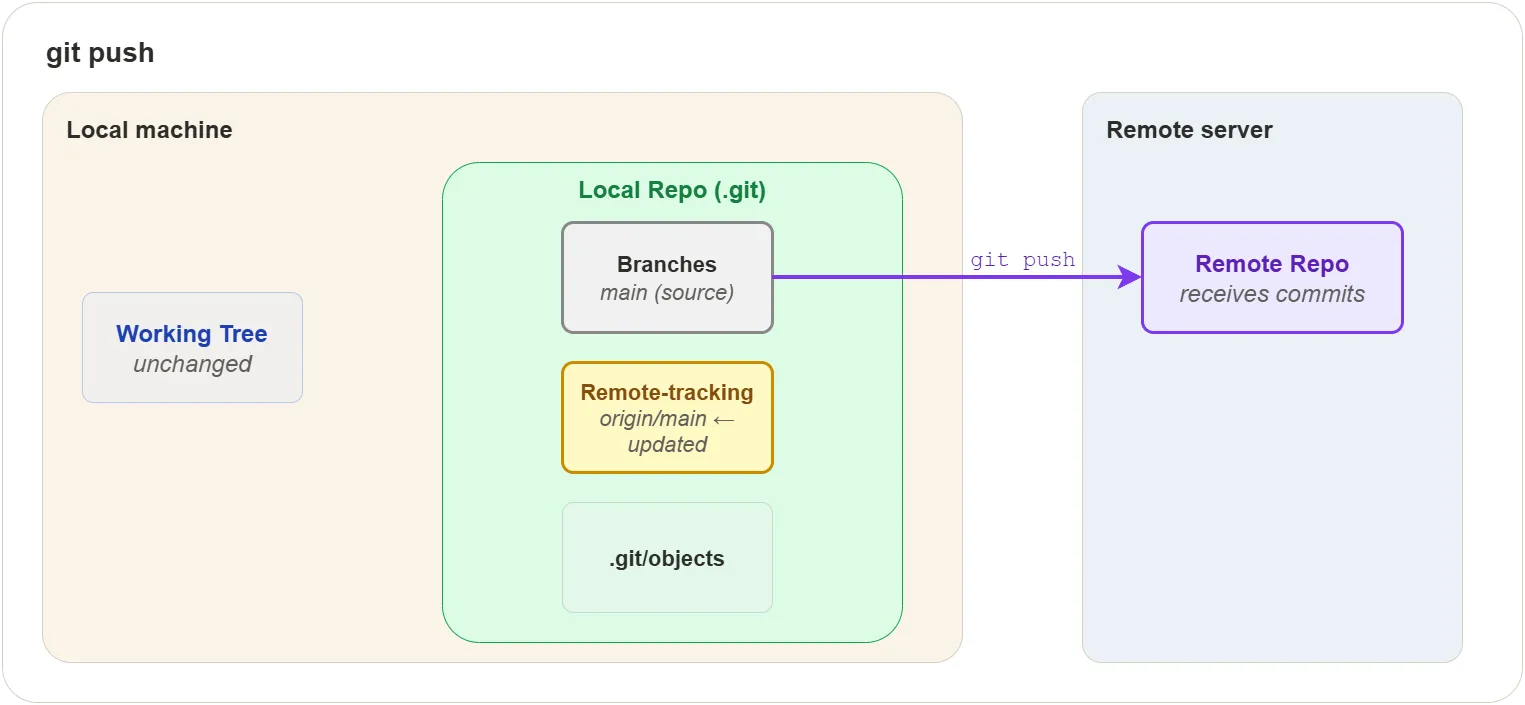
The diagram highlights what changes:
- Remote Repo — receives your new commits
- Remote-tracking branch —
origin/mainis updated to match your local branch - Your working tree — unchanged
- Your branches — unchanged
$ git push origin main
Setting upstream tracking
The -u flag links your local branch to a remote branch so that
future push and pull commands work without specifying the remote
and branch name:
$ git push -u origin feature    # first push — sets up tracking
$ git push                      # subsequent pushes — no arguments needed
Rejected pushes
A push is rejected when the remote branch has commits that your local branch does not have:
! [rejected] main -> main (non-fast-forward)
This means someone else pushed changes since your last fetch. To fix this:
- Pull the remote changes:
git pull origin main - Resolve any conflicts
- Push again:
git push origin main
Force pushing
Force pushing overwrites the remote branch with your local history:
| Command | Behavior |
|---|---|
git push --force | Overwrites unconditionally — can discard others’ work |
git push --force-with-lease | Fails if someone else pushed since your last fetch |
Always prefer --force-with-lease over --force.
Warning: Never force push to shared branches like
main. It rewrites history for everyone and can cause data loss. Use force push only on your own feature branches.
8. Forking
Forking is a hosting-platform feature (not a Git command) that creates your own copy of someone else’s repository under your account. This is the standard way to contribute to projects you do not have write access to.

Setup
- Fork the repository on the hosting platform (e.g. GitHub)
- Clone your fork locally:
$ git clone https://github.com/you/project.git - Add the original as upstream:
$ git remote add upstream https://github.com/original/project.git
Contributing
- Create a feature branch from an up-to-date
main:$ git fetch upstream $ git switch -c feature/my-change upstream/main - Make your changes and commit
- Push to your fork:
$ git push -u origin feature/my-change - Open a pull request from your fork’s branch to the original
repository’s
mainbranch
Keeping your fork in sync
$ git fetch upstream
$ git switch main
$ git merge upstream/main
$ git push origin main
This pulls the latest changes from the original repository into your fork. Do this regularly to avoid large divergences.
Exercises
All exercises use the concepts-lab repository from previous chapters.
Exercise 1: Clone and inspect a repository
Task: Clone a repository and explore what Git sets up automatically.
Steps:
- On GitHub, create a new repository called
clone-labwith a README - Clone it locally:
git clone <url> clone-lab - Enter the directory and run
git remote -v - Run
git branch -vvto see the tracking relationship - Run
git log --onelineto confirm the initial commit is present - List the remote-tracking branches:
git branch -r - Inspect
.git/refs/remotes/origin/to see the tracking reference - Open
.git/configand find the[remote "origin"]section
Verify:
git remote -v shows origin pointing to your GitHub URL.
git branch -vv shows main tracking origin/main.
.git/config contains the remote URL and fetch refspec.
Exercise 2: Fetch and inspect before merging
Task: Practice the fetch-then-inspect workflow instead of pulling directly.
Steps:
- On GitHub, edit a file directly in the browser on the
mainbranch (add a comment line to any file) and commit the change - Back in your terminal, run
git fetch origin - Run
git log main..origin/main --onelineto see what changed - Run
git diff main origin/mainto see the exact differences - Once satisfied, run
git merge origin/mainto integrate the changes - Confirm with
git log --onelinethat the remote commit is now in your local history
Verify:
After merging, git status shows your branch is up to date with
origin/main. The commit made on GitHub appears in git log.
Exercise 3: Handle a rejected push
Task: Simulate a rejected push and resolve it.
Steps:
- On GitHub, edit a file on
mainand commit (simulating a teammate’s push) - Locally, edit a different file on
mainand commit - Run
git push origin main— it should be rejected withnon-fast-forward - Run
git pull origin mainto fetch and merge the remote changes - If there are no conflicts, Git creates a merge commit automatically
- Run
git push origin main— it should succeed - Run
git log --oneline --graphto see the merge in history
Verify:
git log --graph shows the divergence and merge. git status reports
the branch is up to date with origin/main.
Exercise 4: Push with upstream tracking
Task: Set up upstream tracking and verify it simplifies push/pull.
Steps:
- In
concepts-lab, create and switch to a new branchfeature/tracking - Create a file
tracking.txt, stage and commit - Push with the
-uflag:git push -u origin feature/tracking - Run
git branch -vvto confirm the tracking relationship - Make another change, commit, and run
git pushwith no arguments - Confirm the push succeeded without specifying remote or branch
Verify:
git branch -vv shows feature/tracking tracking origin/feature/tracking.
The second push works with no arguments.
Exercise 5: Fork and contribute
Task: Practice the forking workflow using your own concepts-lab
repository as the “original” project.
Steps:
- On GitHub, open
concepts-laband click “Fork” to create a fork under your own account (GitHub allows forking your own repos into an organization, or you can use a second account) - Clone the fork locally into a new directory:
git clone <fork-url> concepts-lab-fork - Enter the directory and add the original as upstream:
git remote add upstream <original-url> - Verify with
git remote -v— you should see bothorigin(fork) andupstream(original) - Create a feature branch:
git switch -c feature/fork-test - Create a file
fork-test.txt, commit it, and push to your fork:git push -u origin feature/fork-test - On GitHub, open a pull request from the fork’s branch to the original repository
Verify:
git remote -v shows two remotes. The pull request appears on the
original repository’s GitHub page.
Quiz
Q1. What does git clone set up automatically?
- A) Only the working tree — no remote or tracking branches
- B) A local copy, an
originremote, and remote-tracking branches - C) A bare repository with no working tree
- D) A fork on the hosting platform
Q2. Where does Git store remote configuration?
- A) In the working tree
- B) In
.git/config - C) In a separate
.remotesfile - D) On the remote server
Q3. What does git fetch change on your machine?
- A) Your working tree and local branches
- B) Only your working tree
- C) Remote-tracking branches and
.git/objects - D) Nothing — it only checks for updates
Q4. After running git fetch, how do you bring the changes into
your working tree?
- A) Run
git fetchagain with--apply - B) Run
git merge origin/main - C) Run
git push - D) The changes are already in your working tree
Q5. What is git pull equivalent to?
- A)
git fetchonly - B)
git mergeonly - C)
git fetchfollowed bygit merge - D)
git pushfollowed bygit fetch
Q6. Why might a git push be rejected?
- A) The remote repository is read-only
- B) The remote branch has commits that your local branch does not have
- C) Your local branch is ahead of the remote
- D) You forgot to run
git addfirst
Q7. What is the advantage of --force-with-lease over --force?
- A) It is faster
- B) It fails if someone else pushed since your last fetch
- C) It pushes all branches at once
- D) It creates a merge commit on the remote
Q8. In the forking workflow, what is the conventional name for the original repository’s remote?
- A) origin
- B) source
- C) upstream
- D) base
Answers
- B — A local copy, an
originremote, and remote-tracking branches - B — Git stores remote names, URLs, and fetch rules in
.git/config - C — Fetch downloads new objects and updates remote-tracking branches
- B — Run
git merge origin/mainto integrate fetched changes - C —
pullfetches and then merges in one step - B — The remote branch has commits that your local branch does not have
- B — It fails if someone else pushed since your last fetch
- C — upstream