Introduction
1. Overview
Git is a version control system. It keeps a complete history of every change you make to your files, so you can go back to any earlier version at any time. Think of it as an unlimited undo button for your entire project.
Why use version control?
- Your work is protected against accidental deletion or hardware failure
- Every change is recorded — you can see who changed what, and when
- You can review changes before saving them permanently
- Multiple people can work on the same project without overwriting each other
- You can experiment on a separate branch and merge it back when it works
In this chapter you will learn:
- What Git is and why version control matters
- How to install Git on your platform
- Where to host your repositories
- How Git moves changes through workspace, index, and repository
- The most common commands in daily operations
2. Features
Git is open source and free to use. Unlike older systems such as Subversion (SVN) where all history lives on a central server, Git is distributed — everyone working on a project has a full copy on their own machine. This means you can work offline, save changes locally, and share with others when you are ready.
- Open source — free, community-maintained, runs on every major platform
- Distributed — every copy contains the complete project and its full history
- Branching — work on separate ideas at the same time without interfering with each other
- Fast — most operations happen on your own machine, with no waiting for a server
3. Installation
Download
Go to https://git-scm.com/downloads and download the installer for your operating system.
Install
| OS | How to install |
|---|---|
| Windows | Run the downloaded installer with the default options |
| macOS | Run xcode-select --install in Terminal, or brew install git if you use Homebrew |
| Ubuntu / Debian | sudo apt-get install git |
| Fedora | sudo dnf install git |
| Arch Linux | sudo pacman -S git |
Verify
Open a terminal and run:
$ git --version
git version 2.47.1
If you see a version number, Git is installed.
4. Hosting
A Git hosting service stores your repositories online so you can access them from anywhere and collaborate with others. You do not need your own server — the hosting provider handles storage, backups and access control.
Main providers
- GitHub — largest community, default for open source
- GitLab — built-in automation for testing and deployment, can be self-hosted
- Bitbucket — integrates with Jira and other Atlassian tools
All three offer free plans for individuals and small teams.
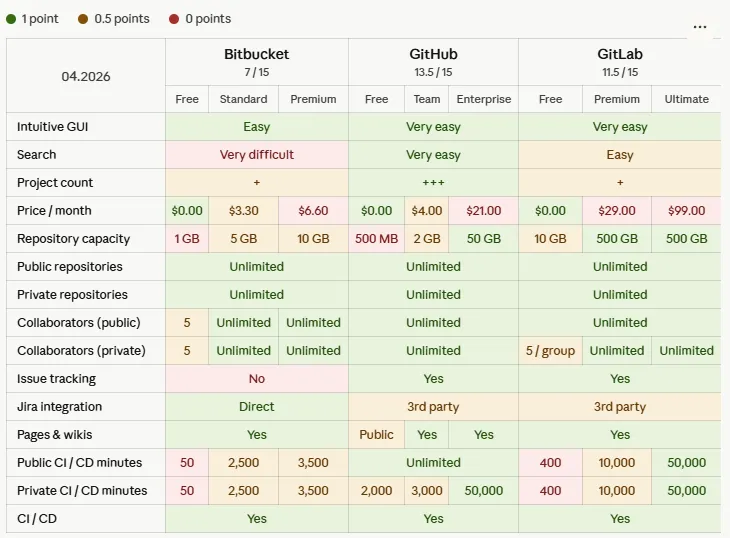
Competitive Matrix
The table below compares the free tiers of each provider.
5. How Git Works
Git moves your changes through three locations before they are shared with others. The diagram below shows these locations and the commands that transfer data between them.
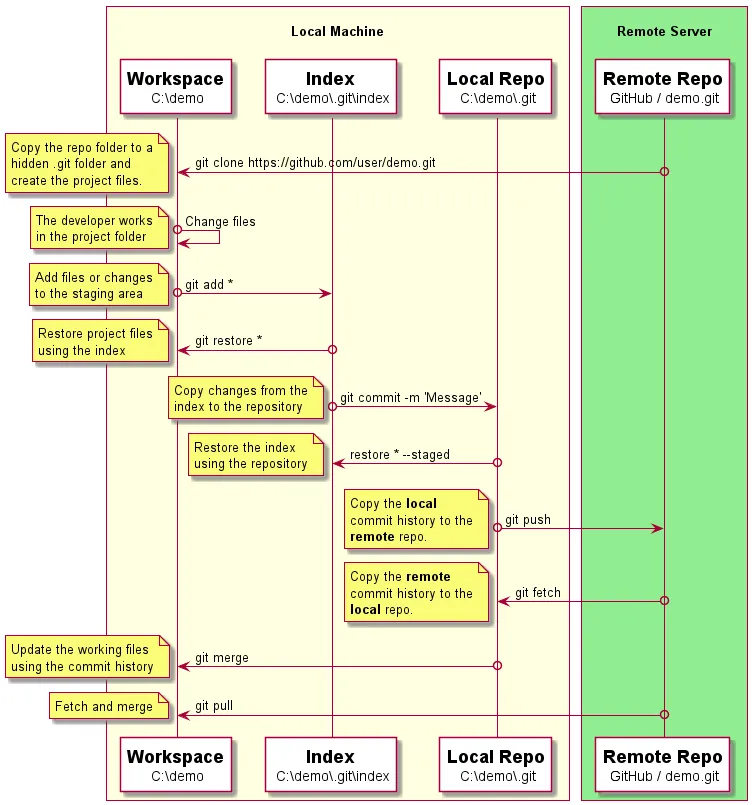
Workspace
The workspace (also called worktree) is the project folder on your computer. This is where you create, edit and delete files. Changes here are not yet tracked by Git — they exist only on your hard drive.
Index
The index (also called the staging area) is a holding area where you
prepare the next commit. You pick which changes to include by adding
them to the index with git add. This lets you commit related changes
together, even if you modified many files.
Repository
The repository stores the full history of your project as a series of snapshots called commits. Each commit records exactly what the project looked like at that moment. The repository can be local (on your machine) or remote (on a hosting service like GitHub). Git treats both as equals — there is no single authoritative copy.
How a Commit Works
When you run git commit, Git takes a snapshot of everything in the index
and stores it permanently in the repository. Each snapshot is called a
commit and gets a unique identifier called a hash — a long string of
letters and numbers that acts like a fingerprint for that snapshot. Every
commit also records who made it, when, and a short message describing
what changed.
Each commit points back to the one before it, forming a chain. This chain is the history of your project — you can follow it backwards to see exactly how the project evolved, one commit at a time.
A ← B ← C ← D   (main)
         ↑
    each commit points to its parent
In the diagram above, D is the latest commit. It points back to C,
which points to B, and so on. Git follows these links to reconstruct the
full history.
6. Command Overview
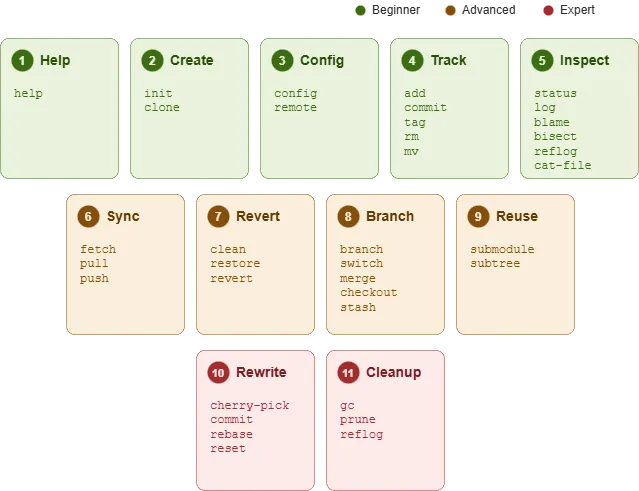
Commands are grouped by category and experience level:
| Level | Categories |
|---|---|
| Beginner | Help, Create, Configure, Track, Inspect |
| Advanced | Sync, Revert, Branch, Reuse |
| Expert | Rewrite, Cleanup (can destroy history) |
Each category is covered in detail in the following chapters. The table below lists the most common commands in daily operations.
| Command | What it does | Example |
|---|---|---|
git clone | Copy a remote repository | git clone https://github.com/user/repo.git |
git status | Show working tree and index state | git status |
git add | Stage changes for the next commit | git add README.md |
git commit | Save a snapshot of staged changes | git commit -m "Fix typo" |
git push | Upload commits to a remote | git push origin main |
git pull | Download and integrate remote changes | git pull origin main |
git log | Show commit history | git log --oneline |
git diff | Show changes between commits or working tree | git diff --staged |
git branch | List or create branches | git branch feature |
git switch | Change the current branch | git switch feature |
git merge | Integrate another branch into the current one | git merge feature |
git restore | Discard or unstage changes | git restore README.md |
Two things worth noting:
- Use
git switch(added in Git 2.23) to change branches. Older tutorials usegit checkout— both work, butswitchis the recommended command. - Create a
.gitignorefile to tell Git which files to skip — build output, editor settings, credentials and other files that should not be tracked.
Exercises
These exercises walk you through a complete Git workflow from start to finish. Each step builds on the previous one.
Exercise 1: Install Git
Task: Install Git and verify it works.
Steps:
- Follow the installation instructions for your operating system above
- Open a terminal and run
git --version - Set your identity so Git can label your commits:
git config --global user.name "Your Name"git config --global user.email "you@example.com"
Verify: git --version prints a version number.
Exercise 2: Clone a Remote Repository
Task: Get a copy of an existing repository from GitHub.
Steps:
- Sign in to GitHub and create a new repository named
git-exercises— check “Add a README file” - Copy the HTTPS URL of the repository
- In your terminal, run
git clone <url> - Enter the
git-exercisesdirectory
Verify: The directory contains a README.md file.
git log shows one commit.
Exercise 3: Add and Commit a Change
Task: Create a file, stage it, and commit it.
Steps:
- Create a file called
hello.txtwith some text in it - Run
git status— the file appears as untracked - Run
git add hello.txtto stage it - Run
git status— the file appears as staged - Run
git commit -m "Add hello.txt"
Verify: git log shows two commits. git status reports a clean
working tree.
Exercise 4: Push to the Remote
Task: Upload your local commit to GitHub.
Steps:
- Run
git push - Refresh the repository page on GitHub
Verify: hello.txt appears in the repository on GitHub.
Exercise 5: Pull from the Remote
Task: Edit a file on GitHub and pull the change to your local machine.
Steps:
- On GitHub, click
README.mdand edit it — add a line of text - Commit the change directly on GitHub
- In your terminal, run
git pull - Open
README.mdlocally
Verify: The local file contains the line you added on GitHub.
git log shows three commits.
Exercise 6: Track a Change
Task: Modify a file and walk it through the full pipeline — workspace, index, repository, remote.
Steps:
- Edit
hello.txtand add a second line - Run
git diffto see the change - Run
git add hello.txt - Run
git diff --stagedto see what will be committed - Run
git commit -m "Update hello.txt" - Run
git push
Verify: git log shows four commits. GitHub shows the updated file.
Quiz
Test your understanding of the concepts covered in this chapter.
Q1. What are the three locations that Git moves changes through before they are shared with others?
- A) Workspace, Index, Repository
- B) Editor, Terminal, Server
- C) Branch, Commit, Push
- D) Local, Cloud, Backup
Q2. What does git commit actually save?
- A) Every file in the workspace
- B) A snapshot of everything in the index
- C) Only the files that changed since the last commit
- D) A copy of the remote repository
Q3. What makes Git different from centralised systems like SVN?
- A) Git requires an internet connection at all times
- B) Git only stores the latest version of each file
- C) Every copy contains the complete project and its full history
- D) Git does not support branching
Q4. What is a commit hash?
- A) A password that protects the commit
- B) A short description of the change
- C) A unique identifier that acts like a fingerprint for a snapshot
- D) The name of the branch the commit belongs to
Q5. What is the purpose of the index (staging area)?
- A) To store the remote repository URL
- B) To prepare which changes go into the next commit
- C) To keep a backup of deleted files
- D) To track which branches exist
Q6. How are commits connected to each other?
- A) They share the same file names
- B) Each commit points back to its parent, forming a chain
- C) They are sorted alphabetically by message
- D) The branch name links them together
Answers
- A — Workspace, Index, Repository
- B — A snapshot of everything in the index
- C — Every copy contains the complete project and its full history
- C — A unique identifier that acts like a fingerprint for a snapshot
- B — To prepare which changes go into the next commit
- B — Each commit points back to its parent, forming a chain